So you’re considering building your own BBQ smoker from scratch so you can get all the features you want and/or need.
In this article we’ll provide you with every little detail you will need to consider in order to build an amazing BBQ smoker.
We’ll talk about things like airflow, temperature control, portability, materials, and the necessary skills to accomplish it.
We’ll also give you a step by step guide on building an easy drum barrel smoker.

In this post we'll cover:
- 1 Important things to consider before you start
- 2 Electric Clay Pot Smoker
-
3 Drum Barrel Smoker
- 3.1 Step 1: Get a 55-gallon drum barrel
- 3.2 Step 2: Burn away the paint and remaining oil
- 3.3 Step 3: Pressure wash and add primer
- 3.4 Step 4: Paint it and add a handle
- 3.5 Step 5: Smoke and season
- 3.6 Step 6: Drill the air intake holes and add side handles
- 3.7 Step 7: Add in the grate
- 3.8 Step 8: Fire and Water
- 4 Final Thoughts
Important things to consider before you start
As I mentioned before, we will talk about the important things to consider, as well as the steps. So before we dive into the step-by-step guide, we’ll discuss the following items:
- BBQ Smoker Areas
- Airflow
- Temperature Control
- Portability
- Materials
- Necessary Skills
Since we’re making a BBQ smoker you will always need to remember that there are two crucial areas that you will need to include.
You will need one area where you will create heat and smoke at the ideal temperatures to cook and another area where food will be contained in a smoky environment.
Ok, so we’re not building the ultimate bbq smoker like these big brand names have, but it’s still a really cool project to complete and these actually work really really well.
Once we go into that, in order to keep your food from getting bitter you will need to make sure that air can flow properly so the smoke doesn’t build up. This is the most important aspect of your smoker.
You will need pipes to connect the fire chamber to the food chamber, but will also need vents so that the smoky air can exit after it rises through the cooking chamber.
Being able to control your smoker’s temperature is the next important aspect. You can achieve this through the use of vents that will help control the airflow.
A gas burner or a hot plate is controllable heat sources so you don’t have to worry about vents. This is something you will have to consider depending on your expertise and preferences.
You have the basics, so now you can consider if you want your smoker to be portable or not. This doesn’t necessarily mean that it’s easy to carry, it’s actually a matter of being able to move it at all.
You can choose to either create one that’s permanently fixed to your property or one that can be moved with the help of rods.
For example, if you choose to create a brick smoker you’ll have to be sure about its location because you won’t be able to relocate it without having to tear it apart.
You might even want to add a rotisserie to your smoker (check out these smokers with rotisseries)
Since we mentioned brick smokers, let’s go ahead and dive into the materials.
Stone and brick are great ones to use since they’re able to hold in heat and thus are able to have more control and maintain the overall temperature.
This isn’t the case with metal, which can have the occasional heat spike if you’re not cautious.
So far so good, but what about the skills needed to dive into a project like this? To make just about any smoker you’ll have to be able to handle masonry and welding.
Today you’ll just need some patience and dedication in order to follow our guide. You can always scale up eventually.
Before you continue, remember you can always buy a commercial BBQ smoker and make the modifications that best accommodate you.
Perhaps install a new thermometer (or two), seal it up, improve the ventilation system and so on.
Now, if you’re truly committed and ready to make your own amazing BBQ smoker, today we’ll share two options:
- A small electric smoker that can use items you already have around your house.
- A large (but cheap) drum barrel smoker
If you’re a beginner, we recommend you start with the electric one since it will be easier to make and to use. If you want a challenge that won’t make a dent in your wallet, opt for the larger smoker.
Now let’s dive right in:
If you need complete plans on how to make the best smoker, check out these guidelines by our friends over at BBQ Smoker Recipes.
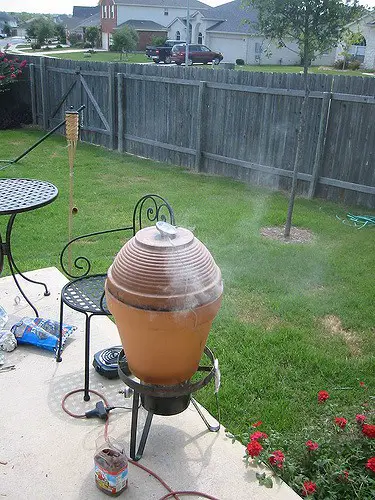
Electric Clay Pot Smoker
This is an affordable, easy to use and easy to make a smoker that is bound to make a nice addition to your home. Remember we mentioned that brick is amazing at holding heat?
Well, clay doesn’t stay behind. This is an easy way of getting a great smoker without a lot of the trouble.
Remember: the size of your materials will depend on your preference.
Material list:
- Hot plate (that can run 1000 watts or more)
- Large clay pot
- Clay bowl (to function as a lid)
- Grate/grill
- Brick scraps or concrete pavers
- Cake pans
Step 1: Get a hotplate
Since we’re making an electric smoker, you will need a hot plate that can run on at least 1000 watts so it can maintain the required temperature.
Since we’ll be using a clay pot, make sure that your hot plate fits inside the bottom of the clay pot.
So a small single burner with a coil would do the trick.
Make sure you don’t make any modifications to it if you don’t have electrical knowledge. Hot plates wiring uses different insulation due to the high temperatures.
We recommend that you leave the hot plate as is or get assistance from an electrician should you decide to make any changes.
Step 2: Get the clay pot, bowl lid and smoking grate
This might be the harder part since all these parts will need to be able to work together and with the hot plate.
Your grate will also need to be smaller than the top of your clay pot in order to fit a few inches down the inside but also be large enough to have enough smoking space.
The lid might be the toughest one since it has to be large enough to sort of seal the smoke within but also not too heavy that you won’t be able to remove it while smoking your meats.
The best way around this, so far, is to drill a handle to the top of the lid. You can accomplish this with a wooden dowel and a little creativity.
Step 3: Assembling the base for your hot plate
Remember the importance of air flow? Well since this is an electric smoker we don’t need to worry about that in order to control the heat but you’ll still need it in order to help the smoke rise.

Thus, we’ll need to use something to elevate the hot plate. You can use bricks but those might be too high depending on the height of your clay pot.
We ended up using concrete pavers broken in half.
We set out three of those as the base for the clay pot and two more inside it to serve as the base for our hot plate.
Step 4: Assembling your smoker
To keep things from getting messy we decided it was better to not put the wood chips directly on the hot plate and instead chose to use a pan to hold the wood for smoking.
A cheap cake pan does the trick.
You might have heard about using a water tray in a smoker, well this one is no exception.
We added a second pan on top (piled over two more pavers, and slightly smaller than the chip pan) to help catch drips but most importantly to provide humidity in order to help the transfer of heat to the food.
Lastly, add the grill and make sure it rests a couple of inches below the rim of the pot, this will give the food being cooked plenty of space inside your smoking area.
And now you’re ready to start smoking your favorite meats in an easy DIY BBQ smoker made entirely by you.
Remember there is always room for improvement so might want to add a thermometer for better control, perhaps an external hot plate control (depending on your hot plate model) or a better surface to place your smoker on.
It’s all up to you.
Now we’ll move on to our second BBQ smoker option which is bigger and won’t use an electric hot plate as a fire source. Keep reading to see if this the one that will work better for you.
If you want to do a more pro-smoker than check out these plans from the barbecue-smoker-recipes.com site, they will get you the complete step by step to building your own.
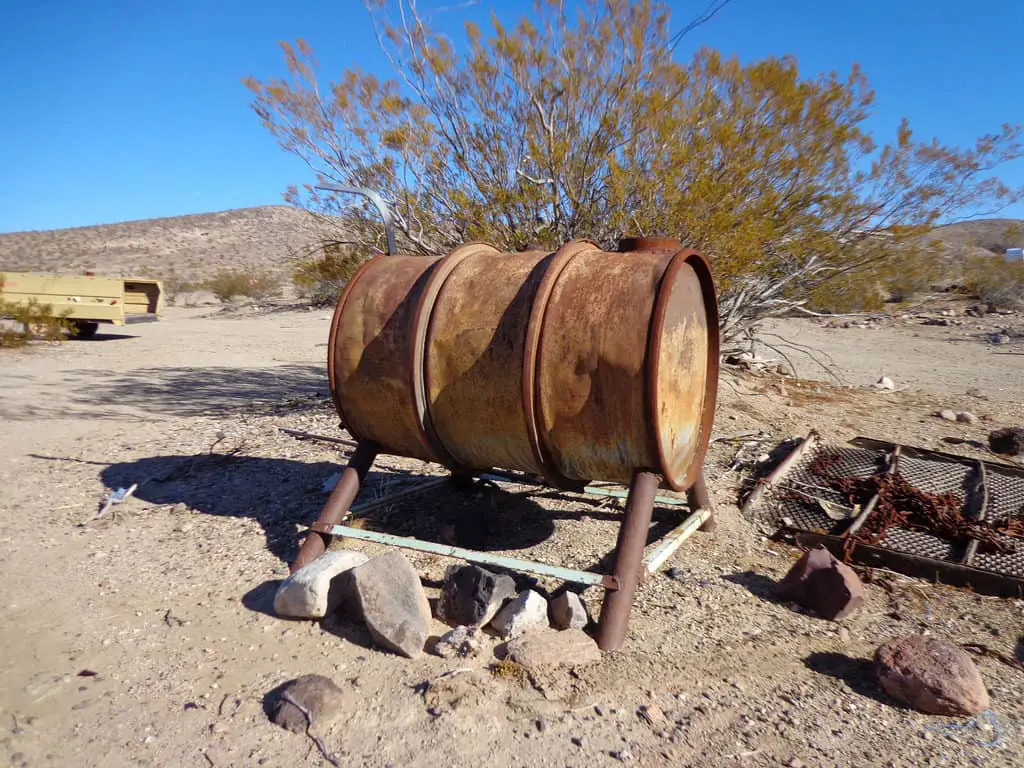
Drum Barrel Smoker
You’re probably thinking: “this thing must require welding skills” or this is definitely “expensive”. Well, let me assure you from now that neither of those is true.
This is both low-cost (under $100) and will require no welding on your part. Continue reading to make your own.
Materials:
- 55-gallon drum barrel
- Propane torch
- High temperature primer (2 spray paint cans)
- High temperature paint (2 spray paint cans)
- Garage door handle (3 pieces)
- Metal caps (3)
- L-shaped brackets (4)
- 21” grill grate
- Chimney Charcoal Starter
Step 1: Get a 55-gallon drum barrel
To save up money, you will have to recycle, so that means your barrel doesn’t need to be brand new. You will have to cut about 3 inches from the top of the “lid”.
Then hammer on the edges of the lid so it can truly act as a lid for the rest of your drum.
If you’re concerned about what could’ve been inside your recycled barrel, opt for one that was used to contain organic oils.
These have the added benefit of not having an interior liner which can be very hard to remove. But before we continue, make sure you wash it thoroughly so no oil remains.
Take your time in this step so it’s as clean as can be.
Step 2: Burn away the paint and remaining oil
In order to remove the exterior paint and any remaining oil, you will need heat.
You can throw your drum barrel in a fire pit or set a fire inside the drum but we’ve found that the best way is to use a propane torch like this Hot Max 500G Propane Torch.
Using a propane torch (which let me tell you, was a lot of fun), you can make sure that the remaining oil is burned off properly through high heat and will eliminate the possibility of cold spots.
Once you hit 1500° F you know no oil or paint could have survived.
Step 3: Pressure wash and add primer
Once the old paint has been removed, I went ahead and pressure washed it. You can take your barrel to a car wash for this.
Then get your high-heat primer ready and coat the outside of both the drum and the lid. You don’t need to coat the inside.
Step 4: Paint it and add a handle
For this, I used 2 cans of this high-heat silver paint because it was on sale last time I checked, but you can choose any color you want as long as it’s heat resistant.
For the handle, I used a garage door handle. You can choose to paint it to match your smoker, but I chose to keep it as is.
Step 5: Smoke and season
Before we can use it we need to coat the inside with Crisco or lard in order to protect it from corrosion.
You will then have to use the 5 lb bag of charcoal and light as a dry run in order to season the inside of your barrel.
Step 6: Drill the air intake holes and add side handles
I started out by drilling 3” inch holes along the bottom of the barrel, I made 3 for good measure but you can drill more if you feel it’s not enough air intake.

I then attached the metal caps with a bolt in order to be able to swing it and cover or uncover the hole if necessary.
To make this awesome smoker portable, we just need the other two handles to both sides of the barrel. This way you can take it with you wherever you go for awesome smoked meats anywhere.
Step 7: Add in the grate
Use the four 3” L-shaped brackets and bolt them to the inside of your drum making sure to leave the same amount of space between them.
Then sit your grate on top of the brackets. A 21” grill grate manages to fit perfectly on this standard drum barrel.
Step 8: Fire and Water
I use my best chimney charcoal starter to hold both the charcoal and the wood, a baking pan underneath to catch the ash and on top of everything a cast iron pan to hold water and help keep direct heat off the meats being smoked.
And you’re all done. Now you have your very own custom-made BBQ smoker to start smoking meat to your heart’s content.
Now the drum barrel can actually be mounted on a trailer as an affordable trailer smoker option, though you should be careful and make sure everything is fastened before taking it out on the road.
Final Thoughts
Whichever method you preferred to use will work perfectly in creating amazing and delicious smoked meats so the decision is up to your personal preference in the end.
Remember both of these smokers can continue to be improved as you learn more about BBQ smokers, and getting a good start with professional plans like these makes all the difference.
The important thing, in the end, is to have fun creating them and learning as much about the smoking process as you can while doing so.
Go on and put them to the test. Have fun using your DIY BBQ smoker!
Read more: this recipe will get you mouth watering smoked meatloaf
